Formatting
Formats Menu
The Headings, Blocks and Custom formats that can be applied to your content are available in the Formats menu — found in the second row of editor buttons.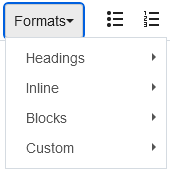
Headings
Using headings gives a hierarchical structure to your content and helps visitors scan and read your content. The page's title serves as the Heading 1, and Heading 2 and Heading 3 are available for use in the content area of your page. Whenever you can organize your page content into topical sections, use the Heading 2 format for your headings to add meaningful section titles. Heading 3 can then be used to organize additional sub-sections. The use of headings on this page is a good example.
For more on the appropriate use of headings, see How To Arrange Your Content.
Didn't I previously use Heading 5 and Heading 6 to format my content?
Yes. In March 2025, as part of university-wide digital accessibility enhancements underway, the primary and secondary headings available in the WYSIWYG editor changed from Heading 5 and Heading 6 to Heading 2 and Heading 3, respectively. This update had no visible impact. When editing existing pages, you may notice old Heading 5s or Heading 6s in place, but these are automatically converted to the more appropriate Heading 2s and Heading 3s on the live, published page.
We recommend you update old headings to the new options as you make your next planned page edits. This is not required, but it will help avoid confusion for future editors. To update a heading in the WYSIWYG editor, select the heading, then select the appropriate new heading level — Heading 2 or Heading 3. Watch a 30-second tutorial.
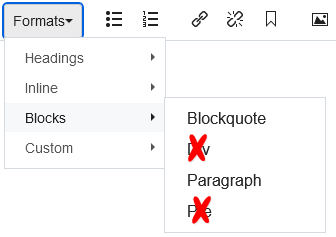
Blocks
Under the Blocks sub-menu, you will find the Paragraph and Blockquote formats to apply to your text. The Paragraph format is the standard text size you use in the body of your page.
You will find the paragraph format applied to your text automatically when you hit Enter/Return on your keyboard at the end of your first paragraph.
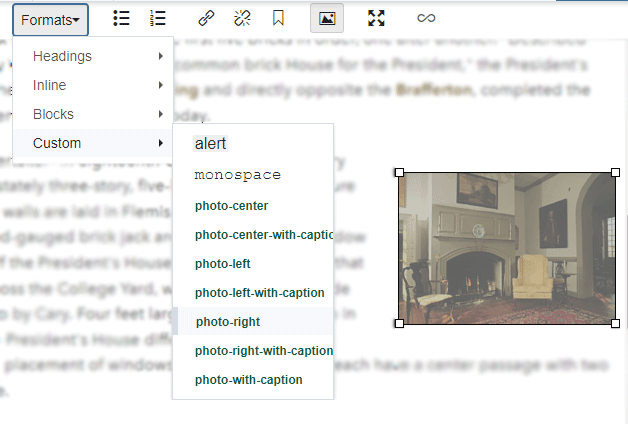
Custom
In the Custom sub-menu, you will find a variety of formats you can use on appropriate content elements — images (photo-left-with-caption, photo-right-with-caption, photo-left, photo-right, photo-with-caption, photo-center, and photo-center-with-caption), tables (table-cell-center-align, table-special, table-special-left, etc.), collapsible lists (table-collapsible), button text (content-button), must-see alert text (alert), and emergency communications (emergency, visible to approved offices only).
To discuss the best use of these options within your unit, department or school, contact your Cascade Manager.
Apply or Change a Format
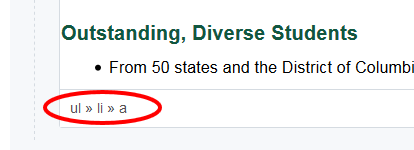
To apply a format, select your element (image, table or text) and use the Formats menu to apply the desired effect. To select an image, click on it; to select a table, place your cursor within the table and click "table" in the path display at the bottom of the editor; to select text, simply highlight it using your cursor. Note, for convenience, you will only see applicable formats in the Formats >> Custom sub-menu for the type of content you have selected.
For images and links, you can also change the format applied using the Class dropdown available in the Insert/edit image and Insert/edit link dialog boxes.
To change or remove a selected format, select the element and select Format >> Clear formatting (![]() ).
).
Troubleshooting
If you find that your edits appear different than expected after applying a format, it's possible it was applied to the wrong element (a leftwithcaption applied to paragraph text instead of the image, Heading 2 applied to the entire paragraph, etc.). To confirm what formats are currently applied to an element, click on or inside that element and look for the path at the bottom of the window. To change or remove the incorrect format, select the element and select Format >> Clear formatting (![]() ).
).